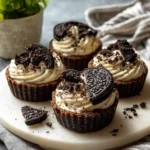
Irresistible Oreo Cheesecake Cookie Cups You Have to Try
There’s something utterly delightful about Oreo Cheesecake Cookie Cups that feels like a little celebration wrapped up in every bite. Growing up in the Devon countryside, I often found that the kitchen was where magic happened—where memories were baked alongside buttery scones and cinnamon-dusted apple crumbles. These cookie cups, with their crisp Oreo base and luscious cheesecake filling, remind me of those cozy afternoons spent sneaking into the kitchen at dawn, whisking ingredients with the kind of joy that only a true food lover knows. They’re the perfect treat to share with friends or to enjoy with a quiet cup of tea, offering a little escape into sweetness and comfort.
Table of Contents
Why You’ll Love This Oreo Cheesecake Cookie Cups
Oreo Cheesecake Cookie Cups are a bit like a hug from your favourite blanket—comforting, indulgent, and utterly satisfying. What I adore most about these treats is how they blend textures and flavours that seem worlds apart but come together in perfect harmony. The crunchy, chocolatey Oreo cookie shell holds a creamy cheesecake centre that’s rich but never too heavy. It’s a bit like the Sunday roasts I remember from my childhood—simple ingredients coming together to create something truly special.
I remember the first time I made these for a small gathering with friends, cramming around my too-small kitchen table. Watching everyone’s eyes light up as they bit into these little cups made me realise that food’s real magic lies in connection and shared moments. Plus, they’re surprisingly easy to whip up, even on a busy weeknight. And if you’ve ever felt intimidated by cheesecake or cookie baking, these cups are a gentle, foolproof way to dive in.
Ingredients You’ll Need for This Oreo Cheesecake Cookie Cups

- 24 Oreo cookies (classic sandwich cookies with filling)
- 8 ounces (225g) cream cheese, softened
- 1/3 cup (65g) granulated sugar
- 1 large egg
- 1 teaspoon vanilla extract
- 1/2 cup (120ml) sour cream or Greek yogurt (for a tangy twist)
- 2 tablespoons all-purpose flour
- Optional: 1/4 cup (60ml) heavy cream for a silkier filling
If you’re looking for substitutions, I’ve often swapped sour cream with Greek yogurt for a lighter touch without losing that tanginess. For the cream cheese, I recommend full-fat for that classic richness, but you can try light cream cheese if you’re after a less indulgent version. The Oreos themselves are quite flexible—feel free to experiment with Double Stuf for an extra creamy shell or even chocolate creme-filled Oreos for a deeper chocolate kick.
Nutrition Facts
- Calories: Approximately 250 per cookie cup
- Protein: 4g
- Fat: 15g
- Carbohydrates: 25g
- Fiber: 1g
- Sugar: 18g
- Sodium: 150mg
These numbers are based on a recipe that yields 24 cookie cups, making them a reasonable treat when enjoyed in moderation. For someone like me, who grew up surrounded by hearty, wholesome meals, these little indulgences feel like a special reward rather than everyday fare.
Print
Irresistible Oreo Cheesecake Cookie Cups You Have to Try
Learn how to make delicious Oreo Cheesecake Cookie Cups. Easy recipe with step-by-step instructions.
- Total Time: 45 minutes
- Yield: 4 servings 1x
Ingredients
- 24 Oreo cookies (classic sandwich cookies with filling)
- 8 ounces (225g) cream cheese, softened
- 1/3 cup (65g) granulated sugar
- 1 large egg
- 1 teaspoon vanilla extract
- 1/2 cup (120ml) sour cream or Greek yogurt (for a tangy twist)
- 2 tablespoons all-purpose flour
- Optional: 1/4 cup (60ml) heavy cream for a silkier filling
If you’re looking for substitutions, I’ve often swapped sour cream with Greek yogurt for a lighter touch without losing that tanginess. For the cream cheese, I recommend full-fat for that classic richness, but you can try light cream cheese if you’re after a less indulgent version. The Oreos themselves are quite flexible—feel free to experiment with Double Stuf for an extra creamy shell or even chocolate creme-filled Oreos for a deeper chocolate kick.
Instructions
- Preheat your oven to 325°F (160°C). Lightly grease two standard muffin tins or line with paper liners for easy removal.
- Carefully twist apart each Oreo cookie to separate the top cookie from the cream filling. Pop the top cookie aside—you’ll fill the cups with just the bottom halves.
- Place the bottom Oreo cookie halves (the ones with the cream filling) into each muffin cup, pressing gently to form the base of your cookie cup. The cream filling helps the cup stick together beautifully.
- In a mixing bowl, beat the softened cream cheese with a hand mixer or stand mixer until smooth and creamy, about 2 minutes.
- Add the granulated sugar and beat again until fully incorporated and fluffy, about 1-2 minutes.
- Mix in the egg and vanilla extract until just combined.
- Stir in the sour cream (or Greek yogurt), followed by the flour. If you’re using heavy cream, add it now and mix gently until smooth.
- Carefully spoon the cheesecake mixture over the Oreo cookie bases in the muffin tin, filling each cup almost to the top.
- Bake in the preheated oven for 18-22 minutes. You’re looking for the edges to set while the centres remain slightly wobbly—just like a traditional cheesecake.
- Allow the cookie cups to cool completely in the tin, then transfer to the fridge to chill for at least 2 hours. This step is crucial for that satisfying creamy texture I always treasure.
- Once chilled, serve straight from the tin or gently remove the paper liners and marvel at your handiwork.
One tip I’ve learned from years of baking with my mum is to resist the temptation to overbake. That slight wobble in the middle is what makes these cookie cups so luscious, and the chill time helps them set perfectly without drying out.
- Prep Time: 15 minutes
- Cook Time: 30 minutes
- Category: Main Dish
- Method: Cooking
- Cuisine: International
Steps to Create Your Oreo Cheesecake Cookie Cups
- Preheat your oven to 325°F (160°C). Lightly grease two standard muffin tins or line with paper liners for easy removal.
- Carefully twist apart each Oreo cookie to separate the top cookie from the cream filling. Pop the top cookie aside—you’ll fill the cups with just the bottom halves.
- Place the bottom Oreo cookie halves (the ones with the cream filling) into each muffin cup, pressing gently to form the base of your cookie cup. The cream filling helps the cup stick together beautifully.
- In a mixing bowl, beat the softened cream cheese with a hand mixer or stand mixer until smooth and creamy, about 2 minutes.
- Add the granulated sugar and beat again until fully incorporated and fluffy, about 1-2 minutes.
- Mix in the egg and vanilla extract until just combined.
- Stir in the sour cream (or Greek yogurt), followed by the flour. If you’re using heavy cream, add it now and mix gently until smooth.
- Carefully spoon the cheesecake mixture over the Oreo cookie bases in the muffin tin, filling each cup almost to the top.
- Bake in the preheated oven for 18-22 minutes. You’re looking for the edges to set while the centres remain slightly wobbly—just like a traditional cheesecake.
- Allow the cookie cups to cool completely in the tin, then transfer to the fridge to chill for at least 2 hours. This step is crucial for that satisfying creamy texture I always treasure.
- Once chilled, serve straight from the tin or gently remove the paper liners and marvel at your handiwork.
One tip I’ve learned from years of baking with my mum is to resist the temptation to overbake. That slight wobble in the middle is what makes these cookie cups so luscious, and the chill time helps them set perfectly without drying out.
Tips for Making the Best Oreo Cheesecake Cookie Cups
From those early mornings whisking eggs in my mum’s cottage kitchen, I’ve learned that baking is as much about patience and intuition as it is about precision. Here are a few tips that will help you channel that same magic into your Oreo Cheesecake Cookie Cups: Learn more: Irresistible Honey Peach Cream Cheese Cupcakes Recipe You Have to Try
- Use room temperature cream cheese: This ensures your filling is smooth and free of lumps, resulting in a silky texture.
- Don’t overmix the batter: Overbeating can incorporate too much air, causing cracks. Mix just until combined for a tender filling.
- Press Oreos gently: You want to form a sturdy base without breaking the cookies apart.
- Chill thoroughly: Patience here pays off—chilling lets the cheesecake set beautifully, making for neat, sliceable cups.
- Experiment with toppings: Fresh berries, a drizzle of chocolate, or a dusting of crushed Oreos add a personal touch reminiscent of those cozy Sunday roasts shared with a crowd at a too-small table.
Serving Suggestions and Pairings

When I think of serving Oreo Cheesecake Cookie Cups, I imagine a small gathering around a worn wooden table, the kind where tea cups clink and laughter fills the room. These little treats shine alongside a warm cup of tea—earl grey or English breakfast are personal favourites, their subtle bitterness balancing the sweetness beautifully.
For a more decadent affair, pair the cookie cups with a rich espresso or a creamy hot chocolate. I’ve also enjoyed them with a dollop of whipped cream and fresh raspberries, which add a tart contrast that dances beautifully with the creamy filling.
If you’re planning a party spread, these cookie cups work wonderfully with other bite-sized desserts like mini fruit tarts or classic Victoria sponge slices, offering a variety of textures and flavours that keep guests coming back for more.
Storage and Reheating Tips
Like many recipes I’ve treasured from my childhood, these Oreo Cheesecake Cookie Cups are best enjoyed fresh but also hold up well if stored properly. I keep mine in an airtight container in the fridge, where they’ll stay perfect for up to 4 days. The cream cheese filling stays creamy and the Oreo base holds its crunch.
If you’re in a pinch and want to serve them slightly warmer, let them sit at room temperature for about 15-20 minutes before serving. I wouldn’t recommend microwaving as it can make the filling too soft and the Oreo base soggy, which is a shame when you’re aiming for that delightful textural contrast.
For longer storage, these cookie cups freeze beautifully. Just place them in a single layer on a baking tray until frozen, then transfer to a freezer-safe container or bag. When ready to eat, thaw overnight in the fridge for the best texture.
Frequently Asked Questions
What are the main ingredients for Oreo Cheesecake Cookie Cups?
The main ingredients for Oreo Cheesecake Cookie Cups include the items listed in our ingredients section above. Each ingredient plays a crucial role in achieving the perfect flavor and texture.
How long does it take to make Oreo Cheesecake Cookie Cups?
The total time to make Oreo Cheesecake Cookie Cups includes both preparation and cooking time. Check the recipe card above for exact timing details.
Can I make Oreo Cheesecake Cookie Cups ahead of time?
Yes, Oreo Cheesecake Cookie Cups can often be prepared in advance. Store it properly in an airtight container in the refrigerator and consume within the recommended timeframe.
What can I serve with Oreo Cheesecake Cookie Cups?
Oreo Cheesecake Cookie Cups pairs well with various sides and accompaniments. Consider the serving suggestions mentioned in the recipe for the best dining experience.
Is Oreo Cheesecake Cookie Cups suitable for special diets?
Depending on the ingredients used, Oreo Cheesecake Cookie Cups may be adapted for various dietary needs. Check the ingredients list and consider substitutions as needed for your dietary requirements.
Final Thoughts
Oreo Cheesecake Cookie Cups are more than just a sweet treat—they’re a way to bring a little magic from my Devon kitchen into your home. They carry memories of early mornings, tea-stained notebooks, and the laughter of too many people squeezed around a small table. The combination of crunchy Oreos and creamy cheesecake feels like a perfect balance of nostalgia and indulgence, something I hope you’ll find as comforting and joyful as I do.
Whether you’re baking for a special occasion or just because, these cookie cups remind us that food is not just for eating—it’s for remembering. So gather your ingredients, roll up your sleeves, and make a batch. I promise, every bite will be a memory in the making.